 Ted Tanner, CEO and Co-Founder
You might have your cultivation processes dialed in to perfection, but even the most skilled grower is only as strong as their weakest link. No matter how experienced you are, something as simple as misplacing a sensor can spiral into a never-ending troubleshooting nightmare, disrupting your entire operation. This nightmare doesn't just stay in the grow room, it manifests in your final product and ultimately hits your bottom line hard.
At Growlink, data is everything. Without reliable data, you're not just throwing a wrench in your process; you're essentially growing blindfolded. Proper sensor placement in cultivation automation is essential for accurate monitoring and optimal plant health. Inconsistent sensor placement can lead to inaccurate data, which directly affects irrigation, nutrient delivery, and overall crop performance. Understanding the specific placement requirements for each sensor and/or substrate type is crucial to avoid these pitfalls.
Proper Substrate Sensor Placement
Rockwool Substrate Placement
For optimal sensor performance in Rockwool cubes and slabs, place the sensor 1 inch from the bottom of the substrate. In Rockwool slabs, position the probe equidistant between two plants to ensure accurate readings, typically on the lower side towards the table drain. 

Coco Substrate Placement (TDR & Teros 12)
The correct sensor placement in Coco substrates for TDR and Teros 12 probes depends on the pot size. For 1-gallon Coco pots, place the sensor 1 inch from the bottom. In 2-gallon pots, the sensor should be 2 inches from the bottom. For larger pots (3 gallons or more), place the sensor 3 inches from the bottom for the best results. 
Coco Substrate Placement (Terralink)
Sensor placement for Terralink probes in Coco substrates also vary based on pot size. In 1-gallon Coco pots, place the sensor 2 inches from the bottom. For larger pots (2 gallons or more), position the sensor 3 inches from the bottom for the best results. 
Troubleshooting
Dealing with Inaccurate VWC Readings
Low/High discrepancies can be experienced when the probe is not inserted perfectly horizontal. If the probe is inserted at even a slight angle, either up or down, it can skew readings by up to 10%. 
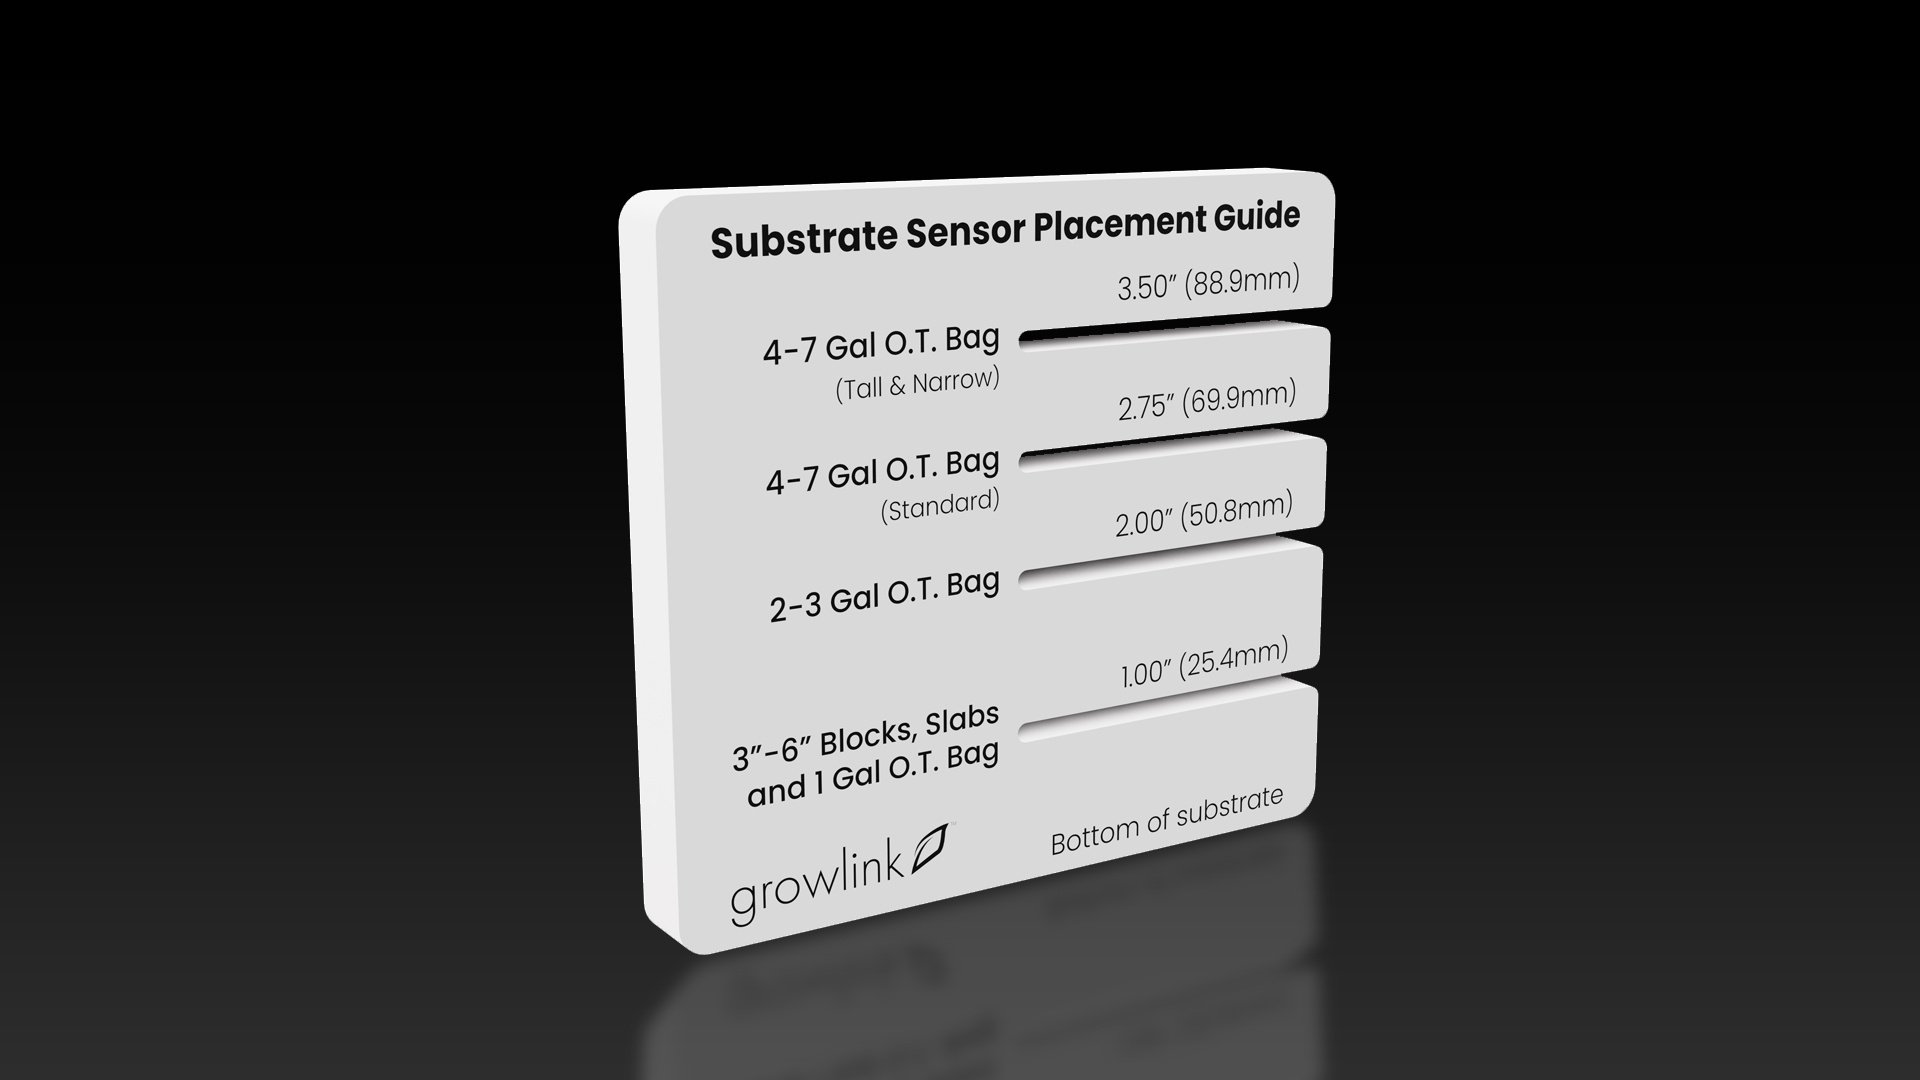
Using the new Growlink Substrate Sensor Placement Guide tool, this can be avoided. 
AFTER ENSURING SENSOR IS PLACED PERFECTLY HORIZONTAL, if your sensor is still reading lower-than-expected Volumetric Water Content (VWC), it may be positioned too high in the substrate, where the sensor's current isn’t fully propagating through the entire substrate. Moving the sensor lower can help achieve more accurate readings.
Conversely, if the sensor is placed too low in the substrate, it may detect pooled water at the bottom, resulting in higher-than-expected VWC readings. To correct this, raise the sensor higher in the substrate to avoid inflated measurements.
Dealing with 0% and 100% VWC Readings
When a sensor reads 100% VWC (Volumetric Water Content), it often indicates an air pocket around the probe that has filled with water, causing inaccurate data. This occurs because the sensor relies on comparing emitted and reflected wavelengths, and solid contact between the substrate and the sensor is crucial for accurate moisture and EC (Electrical Conductivity) readings. To resolve this, try repositioning the probe within the substrate to determine if the issue is due to poor contact or a problem with the sensor itself.
Similarly, if your sensor is reading 0% VWC and 0 EC, but still reports temperature, it may also be due to an air pocket around the probe, but one that hasn't filled with water. This can happen when the probe isn’t properly seated in the substrate, behaving as if it were not inserted at all. To correct this, move the probe to a different spot within the same substrate or try a different substrate entirely to ensure proper contact.
Sealing the Deal on Sensor Placement
Whether you’re running a solo operation or managing a team of cultivators, it's crucial that everyone understands the importance of proper sensor placement. Accurate positioning ensures your entire system functions optimally, leading to reliable data collection, precise control over your growing environment, and healthier crops with better yields. By following these guidelines, you can avoid common pitfalls and collect accurate data that will fuel improvement in future growing cycles.